III. Adding Internet: Intro. to Functions
- Overview
- Goals
- Recommended Preparation
- Part 1: Responding to the Cloud
- Part 2: Testing your Code via the App
- Part 3: The Internet of the Thing
- Going Further
- ACM Curriculum
- Reference
Overview
This project will allow you to control your LED from the Internet!
Goals
- Introduce basic cloud-based services.
- Work with string parsing.
- Start using a REST API
Recommended Preparation
- Complete the previous Blinky Project
- Find out about functions. Review
Particle.function() - Learn a little about POST methods.
- Learn about the Particle Console
Part 1: Responding to the Cloud
This example comes directly from Particle’s Control LEDs over the `net example. You’ve already completed the Intro and Setup. You just need to add a little more Code. Either replace your existing code with the following, or create a new file, or open the “WEB-CONNECTED LED” example app:
// CODE COPIED FROM https://docs.particle.io/guide/getting-started/examples/photon/#code-1
// Also available as the "WEB-CONNECTED LED" in the Example Apps section of your Particle Apps panel.
// -----------------------------------
// Controlling LEDs over the Internet
// -----------------------------------

/* First, let's create our "shorthand" for the pins
Same as in the Blink an LED example:
led1 is D0, led2 is D7 */

int led1 = D0;
int led2 = D7;

// Last time, we only needed to declare pins in the setup function.
// This time, we are also going to register our Particle function

void setup()
{

   // Here's the pin configuration, same as last time
   pinMode(led1, OUTPUT);
   pinMode(led2, OUTPUT);

   // We are also going to declare a Particle.function so that we can turn the LED on and off from the cloud.
   Particle.function("led",ledToggle);
   // This is saying that when we ask the cloud for the function "led", it will employ the function ledToggle() from this app.

   // For good measure, let's also make sure both LEDs are off when we start:
   digitalWrite(led1, LOW);
   digitalWrite(led2, LOW);

}


/* Last time, we wanted to continuously blink the LED on and off
Since we're waiting for input through the cloud this time,
we don't actually need to put anything in the loop */

void loop()
{
   // Nothing to do here
}

// We're going to have a super cool function now that gets called when a matching API request is sent
// This is the ledToggle function we registered to the "led" Particle.function earlier.

int ledToggle(String command) {
    /* Particle.functions always take a string as an argument and return an integer.
    Since we can pass a string, it means that we can give the program commands on how the function should be used.
    In this case, telling the function "on" will turn the LED on and telling it "off" will turn the LED off.
    Then, the function returns a value to us to let us know what happened.
    In this case, it will return 1 for the LEDs turning on, 0 for the LEDs turning off,
    and -1 if we received a totally bogus command that didn't do anything to the LEDs.
    */

    if (command=="on") {
        digitalWrite(led1,HIGH);
        digitalWrite(led2,HIGH);
        return 1;
    }
    else if (command=="off") {
        digitalWrite(led1,LOW);
        digitalWrite(led2,LOW);
        return 0;
    }
    else {
        return -1;
    }
}
Program your Photon!
Part 2: Testing your Code via the App
- If you haven’t already done so:
- Use the App to send commands to your LED:
Part 3: The Internet of the Thing
To be able to interact with your “Things” from the web, you’ll have to:
- Get the Access Token associated with your account.
- Get the ID of the “thing” you want to interact with.
- Use these (the token and ID) in a webpage that sends commands to the “thing”. This example uses a simple, non-secure webpage and HTML POST methods.
Creating the WebPage
This example includes your Access Token and your Device ID in readable HTML. It should only be on secure machines. Posting it publicly would allow anyone to interact with your device!!!
Create a new file using a text editor. Make its extension be .html and paste the following HTML in it:
<!-- Replace your-device-ID-goes-here with your actual device ID
and replace your-access-token-goes-here with your actual access token-->
<!DOCTYPE>
<html>
  <body>
  <center>
  <br>
  <br>
  <br>
  <form action="https://api.particle.io/v1/devices/your-device-ID-goes-here/led?access_token=your-access-token-goes-here" method="POST">
    Tell your device what to do!<br>
    <br>
    <input type="radio" name="arg" value="on">Turn the LED on.
    <br>
    <input type="radio" name="arg" value="off">Turn the LED off.
    <br>
    <br>
    <input type="submit" value="Do it!">
  </form>
  </center>
  </body>
</html>
(Code is an excerpt from Particle’s Control LEDs over the `Net example)
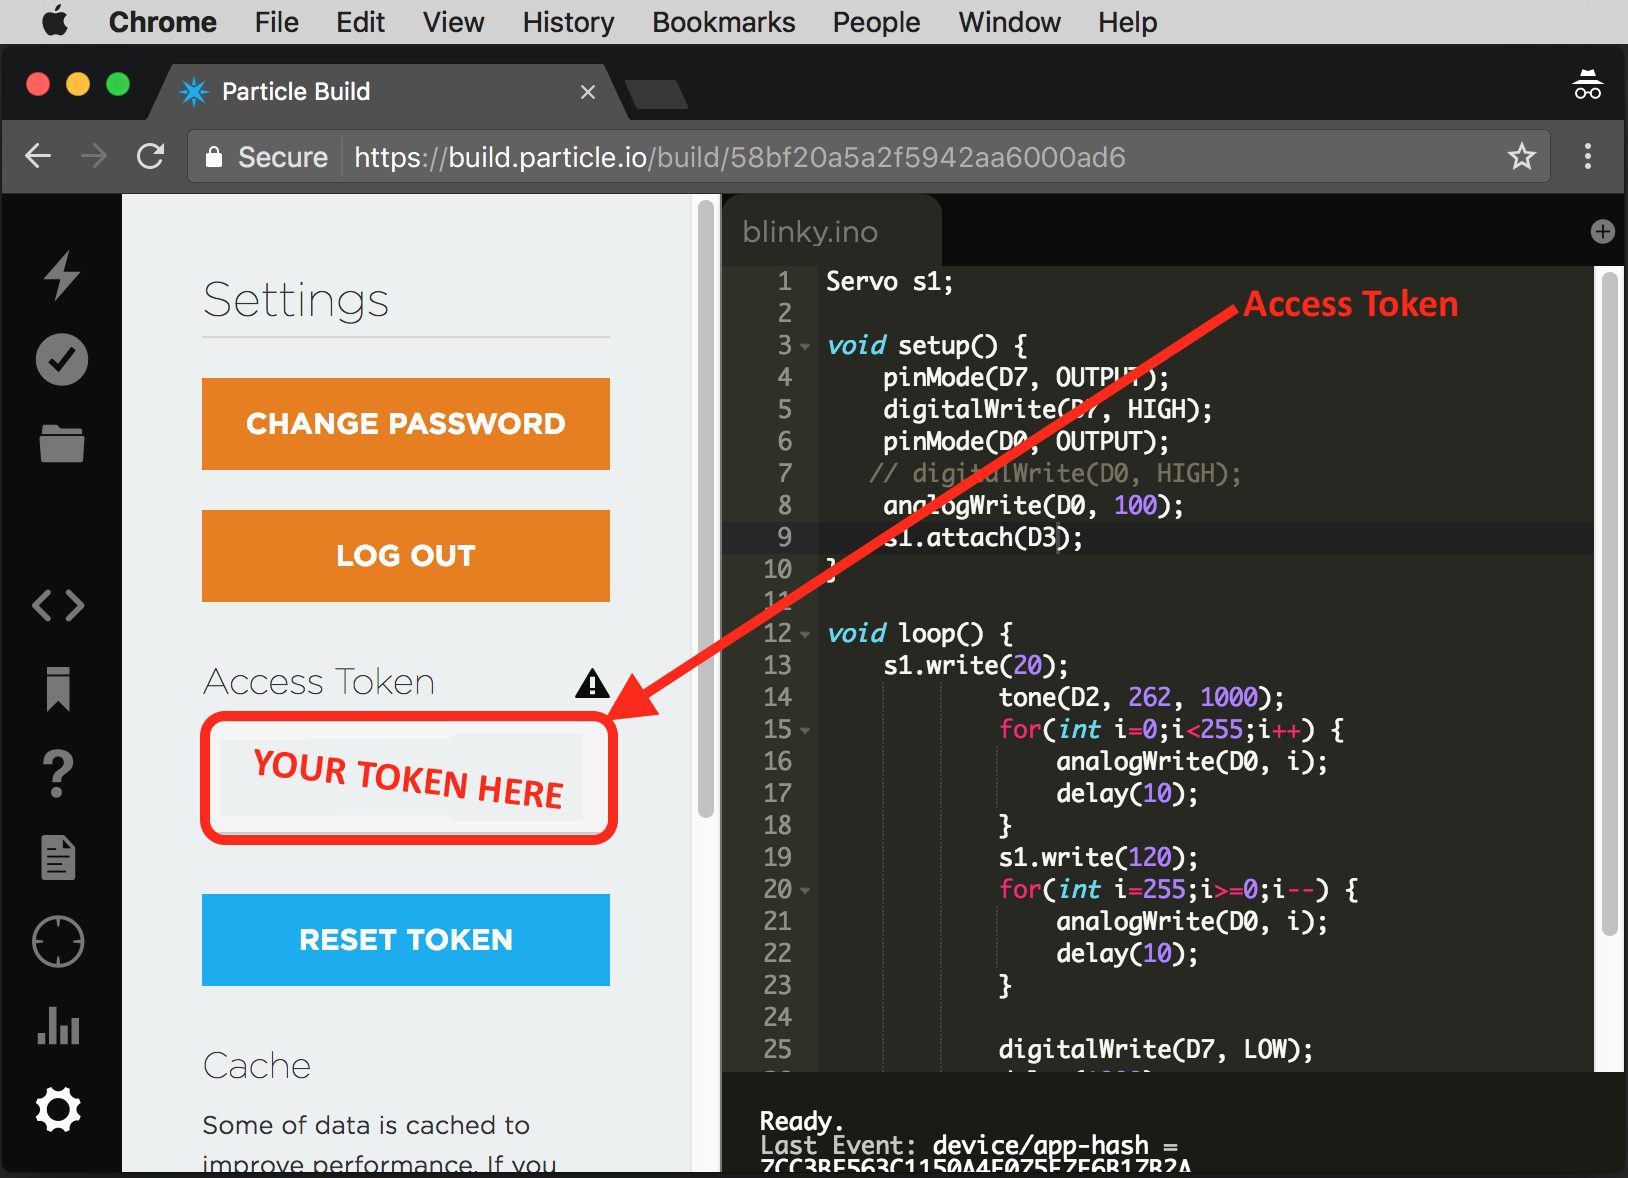
Adding your Access Token to the code.
- Open the Particle.io Build Page and select
Settings:

- Copy the Access Token and paste it into the HTML file in place of the
your-access-token-goes-hereplaceholder on the 10th line.
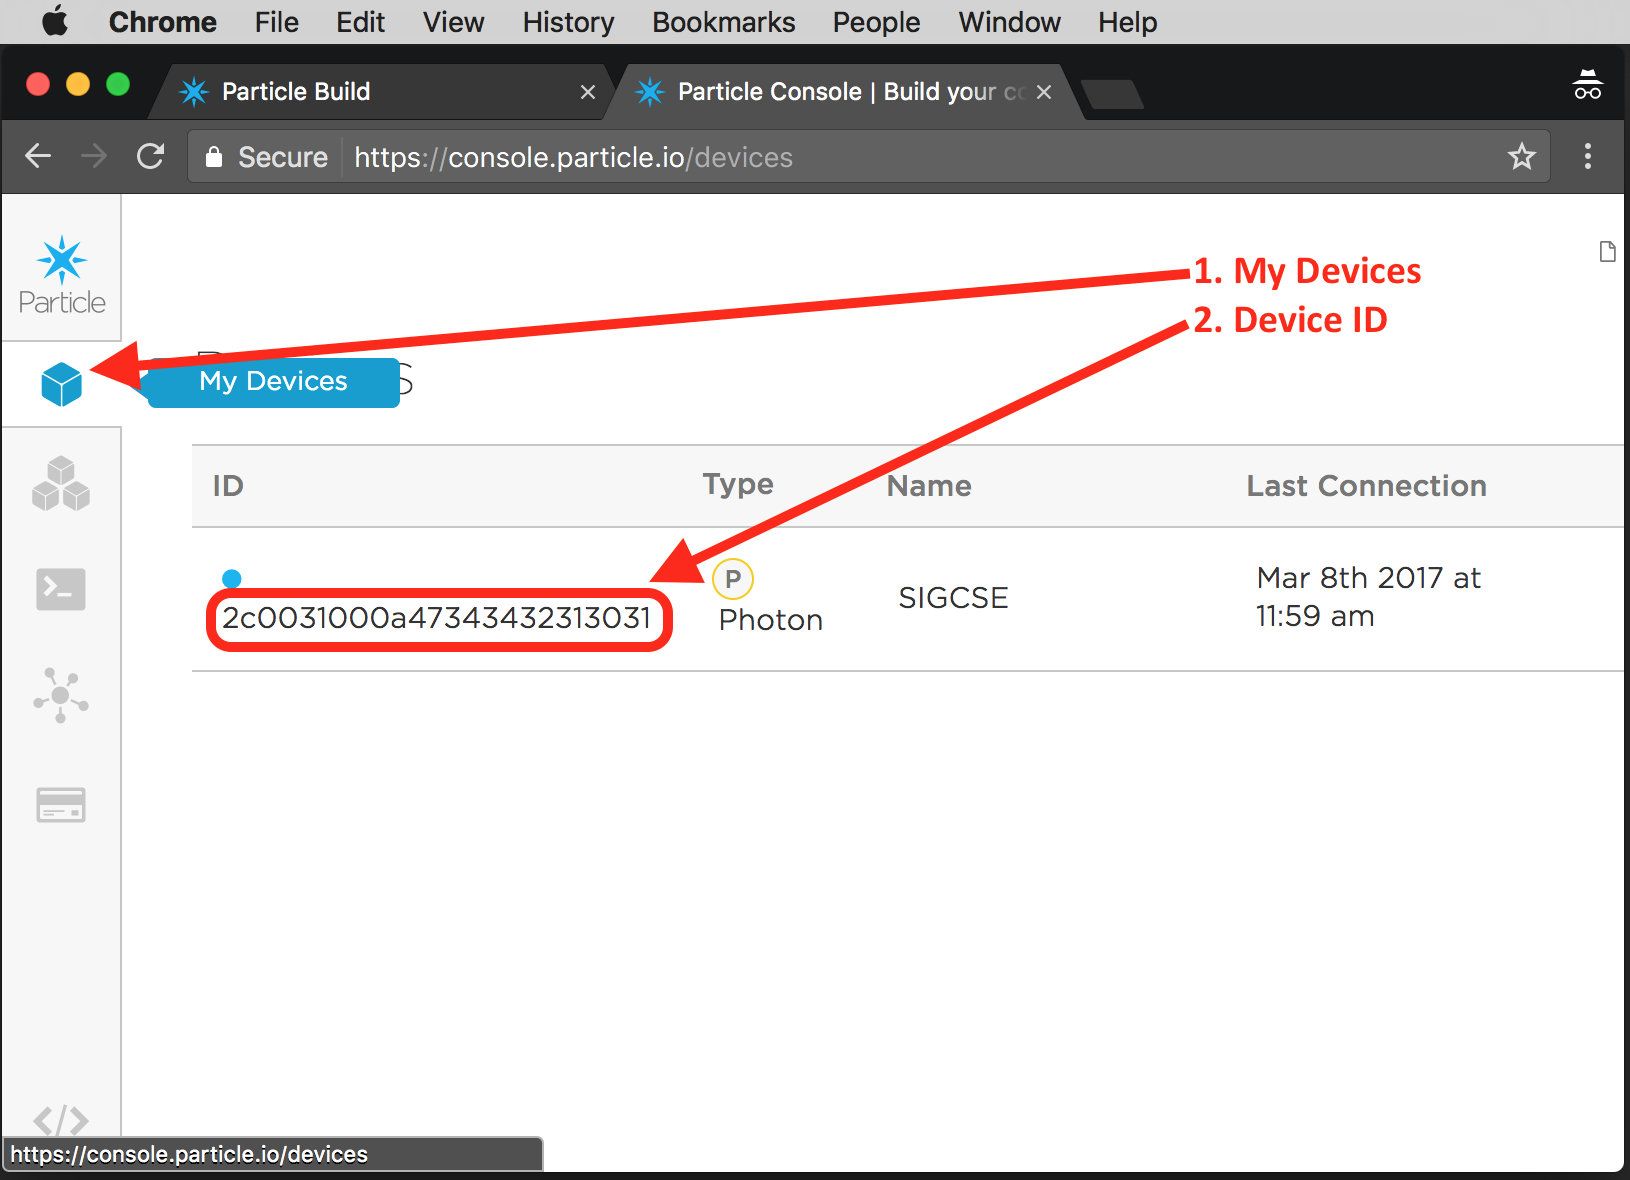
Adding the ID of the “thing”
- Open the Particle Console
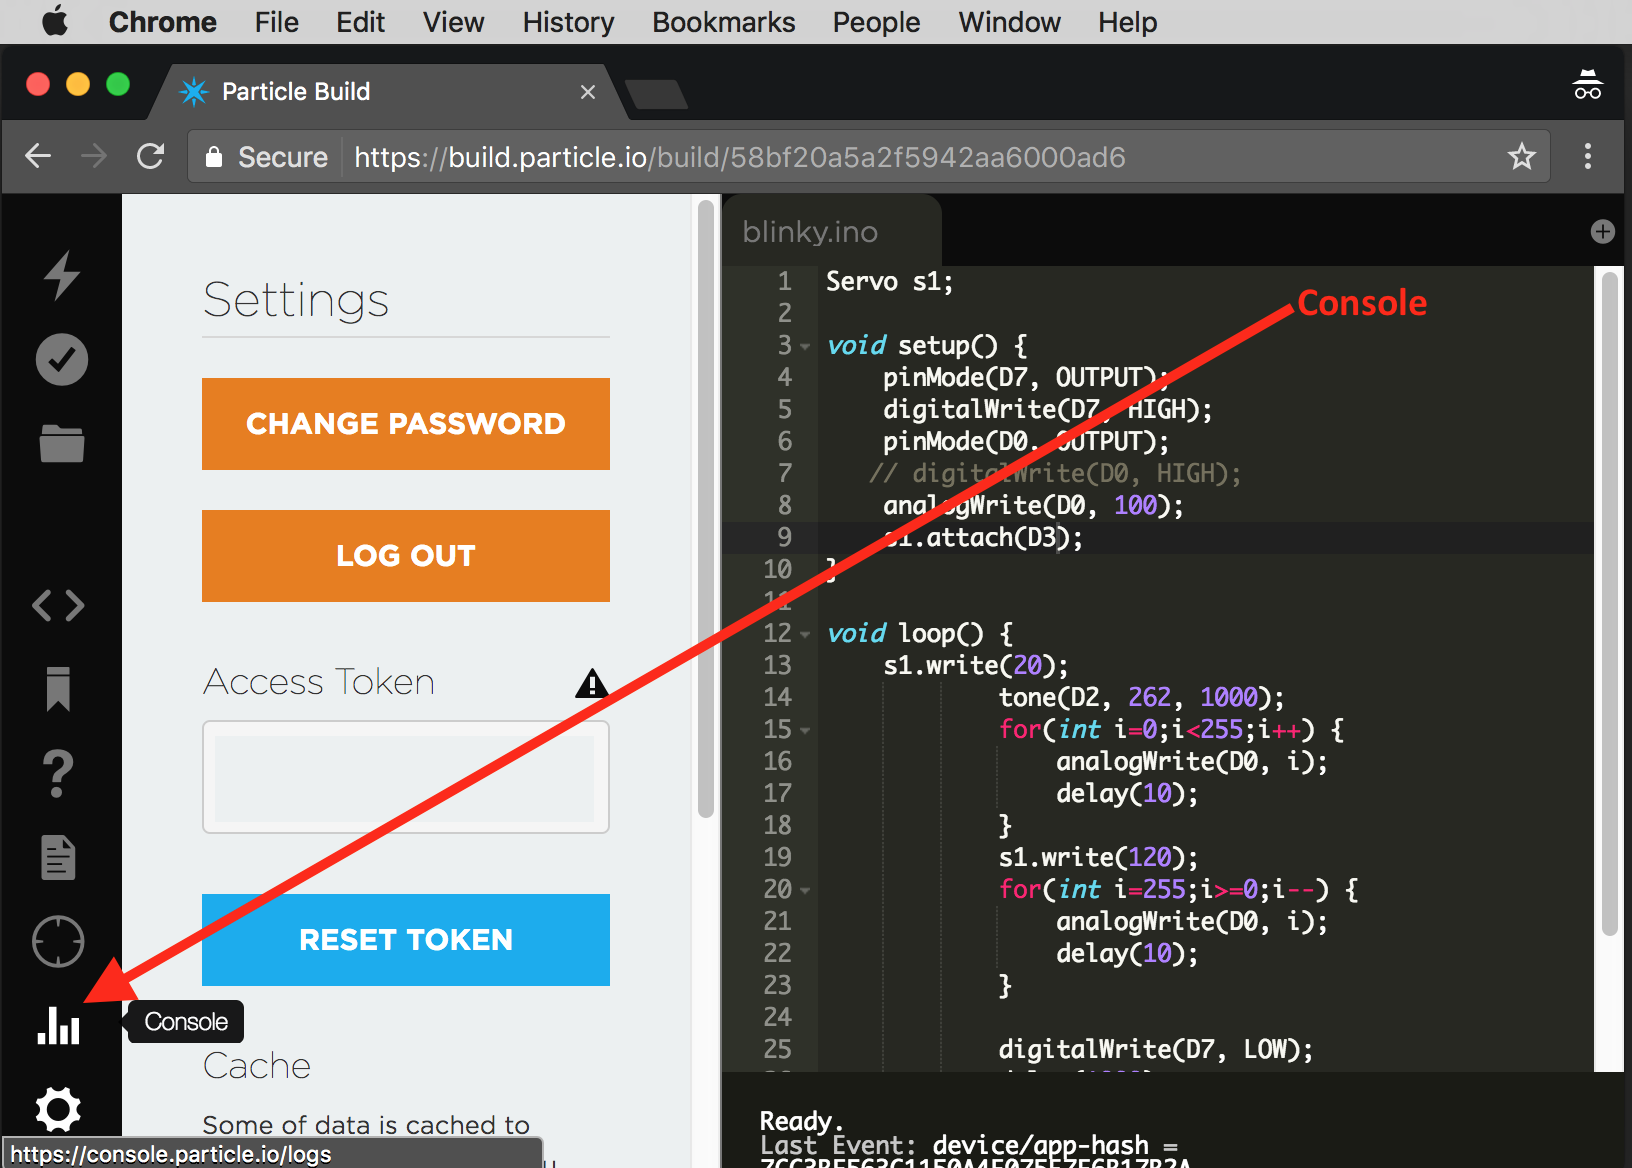
- Select the
My DevicesTab, Copy the Device ID for your Photon, and Paste it into the HTML file in place of theyour-device-ID-goes-hereplaceholder on the 10th line.
Trying It
- Save the HTML file.
- Open it in a browser and try it out!
Going Further
- Add a
blinkcommand that will make the LED blink. - Add a
fadeOn Ncommand, where the parameterNis a number indicating the total time for the fade to take (in milliseconds). Hint: Review the features of theStringClass to separate and parse the integer value. - Add an
onIn Ncommand, where the parameterNis a number indicating how long until the light should turn on from when the command is received. Hint: Review the features of theTimerObjects. - Add a complementary
offIn N. - Tracing, (i.e., using log messages from
printstatements to understand the execution of code), is one of the most valuable debugging techniques for the Photon. Learn how use theSerialobject to see debugging messages. - Add a
onAt Ncommand, where the parameterNindicates the UTC time at which the light should turn on. The Photon includes functions to Synchronize the Time and get or set properties of current time. Pay close attention to time zone and daylight savings time. (Seriously consider using log messages to help debug your work!)